Digital signatures
Use digital signatures to sign documents without needing to print, sign, and scan them.
Create a stamp
The first step in creating a digital signature is to create a stamp. A stamp is an image that represents your signature:
-
Scan your signature and save it as an image file. For best results, use a PNG file with a transparent background.
-
Open the
Directory Personfor which you want to create a stamp. -
Click the
Attachmentstab. -
Click Add Attachment.
A new row shows in the attachment table:
 Figure 1. A new
Directory Attachmenttable row. -
Fill in the fields:
-
Type: Select attachment type. -
Caption: Enter a caption for the stamp. -
Filename: Click Choose File and select the image file. -
Stamp: Select to use the uploaded image as a stamp in theDocument Viewer. -
Resizable: Select to allow stamp resizing.
-
Using labels
Use labels to add text to a stamp. This is useful when text needs to be consistently added along with the stamp. For example, you could add the date and time to a date line.
-
Open the
Directory Personfor which you want to create a stamp. -
Click the
Attachmentstab. -
Click + under the
Labelsfield. -
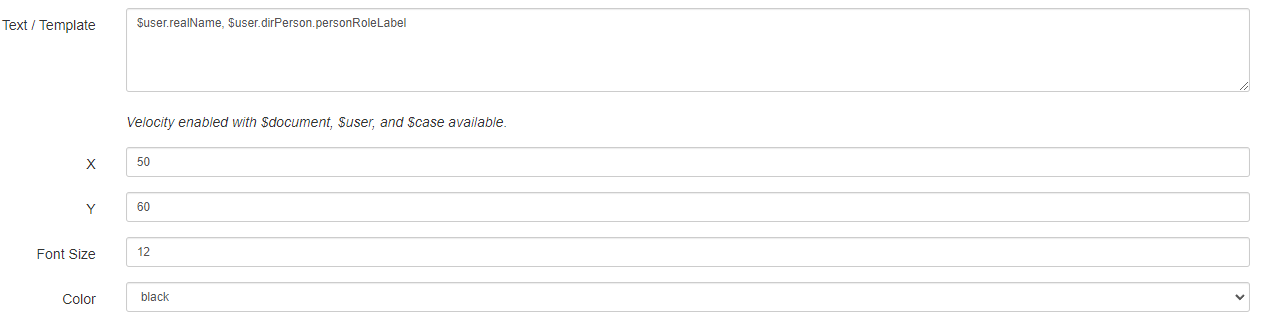
Enter the text or template you want to use.
Some examples are:
-
Date and time:
$DateUtil.formatDateTime($now) -
Users real name:
$user.realName -
Users directory person role:
$user.dirPerson.personRoleLabel
These template examples populate the field with the current time or values from the
Directory Person.You can add multiple labels to the same stamp. -
-
Set the
xandypage coordinates for the label.
|
The coordinates are relative to the top-left corner of the stamp. 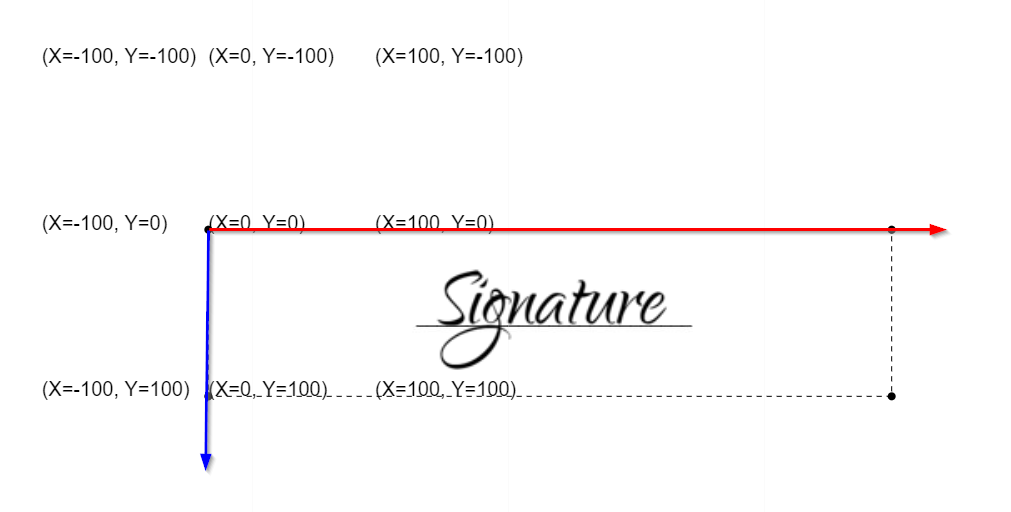
Figure 2. Example stamp with labels to show coordinates.
|
+ You may need to experiment to find appropriate coordinates to fit the stamp. You only need to complete this process once.
-
Set the
Font Size. -
Set the
Font Color.
Sign a document
Once you create a stamp, you can use it to sign documents:
-
Open a document in the
Document Viewer.-
Open a
Case. -
Click the
Filing Cabinettab. -
Right-click a document and select
DocView.
-
-
Click Stamps & Signatures.
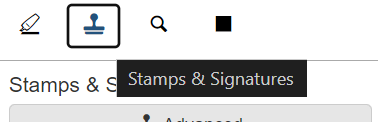 Figure 4. The Stamps & Signatures button.
 -
In the
Stamps & Signaturesarea, click the stamp you want to use.The stamp name matches the Captionyou set on the attachment. -
Click the location on the document where the stamp should show.
-
Optional: move the stamp to the desired location.
-
Optional: resize the stamp.
-
Click Apply Stamps to finish signing the document.