Manage special statuses
Use the Manage Special Statuses screen to configure whether a Case Special Status, Person attribute, or Directory Person attribute is shown before the Case Header, Person Header, or Directory Person Header.
You can also configure the background color for the Case special status, Person attribute, and Directory Person attribute.
The screen shows links to the corresponding lookup lists at the top.

Managed Special Status screen.Manage case special statuses
Case Special Statuses show in the Case Header to call attention to important case information.
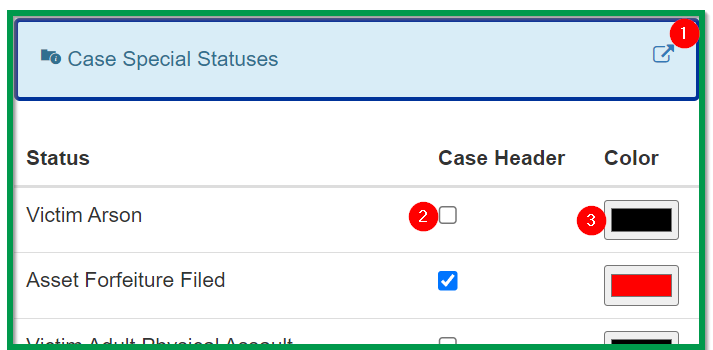
Case Special Statuses panel.-
Click to open the
CASE_SPECIAL_STATUS_TYPElookup list in a new browser tab. -
Select to show the attribute before the
Case Header: Figure 3. A
CaseSpecial Status showing before theCase Header. -
Click to set the status background color in the
Case Special Statusarea.
Manage person attributes
Person attributes highlight information about individuals.
You can show Person attributes in the Person Header and the Case Header.
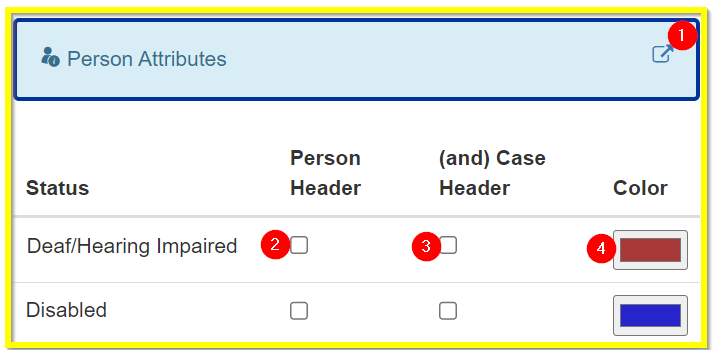
Person Attributes panel.-
Click to open the
PERSON_SPECIAL_STATUSlookup list in a new browser tab. -
Select
Person Headerto show thePersonattribute before thePerson Header: Figure 5. A
Personattribute before thePerson Header. -
Select
(and) Case Headerto show thePersonattribute before theCase Header: Figure 6. A
Personattribute before theCase Header. -
Click to set the status background color in the
Case Special Statusarea.
Add a Person attribute
-
Navigate to .
-
Click
 in the
 Person Attributespanel. -
Open a
Person. -
Click the down arrow next to the
Summarytab. -
Click
Add Person Attribute. -
Set the attribute by filling in the required fields.
-
Click Save.
Set an attribute to show in the Person Header and Case Header
-
Navigate to .
-
In the
Person Attributespanel, find thePersonattribute. -
Select
Person Header. -
Select
(and) Case Header.If you do not show an attribute in the Person Header, you cannot show the attribute in theCase Header. -
Optional: click the
Colorbox to select a custom color. -
Click Save.
Manage directory person attributes
Directory Person attributes highlight information about Justice Personnel.
You can show Directory Person attributes in the Directory Person Header and Case Header.
Directory Person attributes are useful when an individual needs to be tracked for Brady/Giglio alerts.
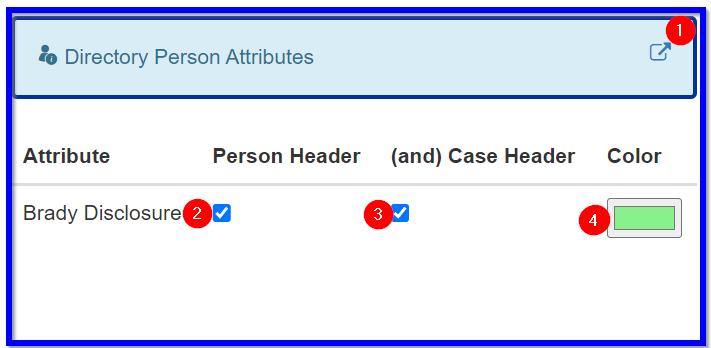
Directory Person Attributes panel.-
Click
to open the DIR_ATTRIBUTE_TYPElookup list in a new browser tab. -
Select
Person Headerto show theDirectory Personattribute before theDirectory Person Header: Figure 8. A
Directory Personattribute before thePerson Header. -
Select
(and) Case Headerto show theDirectory Personattribute before theCase Header: Figure 9. A
Directory Personattribute before theCase Header. -
Click to set the attribute background color in the
Case Special Statusarea.
Add, update, or delete directory person attributes
-
Navigate to .
-
Click
in the Directory Person Attributespanel. -
Add, update, and delete
Directory Personattributes as needed. -
Click Save.
Set an attribute on a Directory Person
-
Navigate to .
-
Enter search criteria, then click Search.
-
Open a
Case. -
Click the
Case Involvementnavigation item. -
Click
 next to the desired
 Justice Personnel. -
Click the down arrow next to the
Summarytab. -
Select
Update Directory Person. -
Scroll down to the
Attributesection. -
In the
Attributefield, enter the attribute name. -
In the
Attribute Typefield, select an existing attribute. -
In the
Valuefield, enter a summary of important information related to the attribute. -
Optional: set the
Start DateandEnd Datefields. -
Click Save.
Set an attribute to show in the Directory Person Header Form and Case Header Form
-
Navigate to .
-
In the
Directory Person Attributessection, find theDirectory Person Attributes. -
Select
Person Header. -
Select
(and) Case Header.If you do not show an attribute in the Directory Person Header Form, you cannot show the attribute in theCase Header Form. -
Optional: click the
Colorbox to select a custom color. -
Click Save.
The attribute shows in the Case Header Form for every case the Directory Person is involved with.
In the Case Header Form, the system shows the Attribute Type using the selected color.
Click the paragraph icon for the notification to show a popup with the Attribute Type, Justice Person name, and the Value field.