User accounts
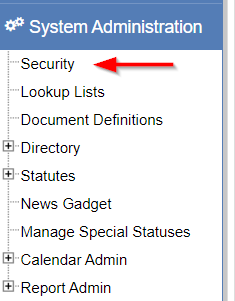
Access the User Accounts section by navigating to :

Create a new user
On the Users page, click New User at the bottom of the page.
The Create New User page shows.
Fill in the information for the user:
-
Username: The username used by the new user to login to eProsecutor Online. -
Real Name: The real name of the person using the system. -
Directory Person: This user account can be linked to aDirectory Personby searching for theDirectory Personin this field. If the user account is associated with aDirectory Person, theReal Namefield is populated by the system. -
Email: This is the user email address. When the new account is created, an account creation email is sent to this email address so the user can finish setting up their account. Password reset requests are also sent to this email. -
Security Group: Permissions can be given to the user according to the Security Group they are assigned to.
An asterisk indicates a required field.
Manage user accounts
As an administrator, you can delete user accounts, reset passwords, and updating user permissions.
Delete user accounts
-
Navigate to .
-
Search for the user account you want to delete.
-
Click the username of the user.
-
On the
User Account Settingspage, click Delete at the bottom of the form. -
You are prompted to confirm that you want to delete the user. Click OK to delete the account.
Reset passwords
-
Navigate to .
-
Search for the user account whose password must be reset.
-
Click the username of the user.
-
On the
User Account Settingspage, click Reset on thePasswordfield. -
You are prompted to confirm that you want to reset the user password. Click OK to reset the password. An email is sent to the user email address with a link to reset their password.
Update user permissions
-
Navigate to .
-
Search for the user account you want to update.
-
Click the username of the user.
-
On the
User Account Settingspage, change theSecurity Groupof the user. A description of the permissions available to each security group can be found here. -
Click Save at the bottom of the form.
Workflow roles
It may be required to set the Workflow Roles for some users.
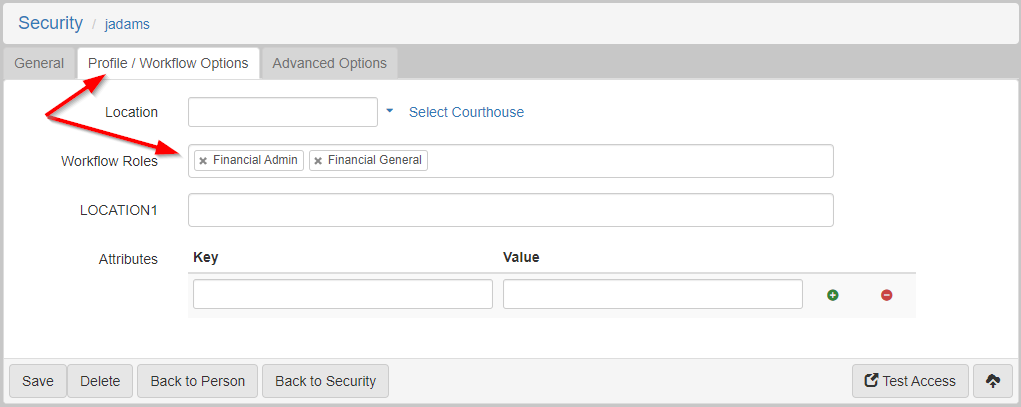
If a user is working with Financials, then they likely need to be assigned the Financial General Workflow Role or Financial Admin Role, if they should administer financials or not.
The Financial Workflow Roles grant access to workflows such as approving refund requests.
To set the Workflow Roles:
-
Navigate to .
-
Search for the user account you want to update.
-
Click the username of the user.
-
On the
User Account Settingspage, click theProfile/Workflow Optionstab. -
Fill in the
Workflow Rolesfield, then click Save.

Advanced options
If a user gets locked out of their account, you can come here to unlock the account. The screen reports how many login attempts were recently made. You can also set a date for the account to expire.
If an account is locked due to too many failed attempts, you can restore access by following these steps:
-
Clear the
Failed Login Countfield. -
Deselect
Account Locked. -
Clear the
Password Expiredfield or setting it to a date somewhere in the future.
You can also use this tab to expire an account sometime in the future or indefinitely.
You can set an Account Expires date or you can select Account Disabled to disallow logins to the account.
This also prevents the user from being able to request password reset link through email.
It is advised to do this if you must remove access to the system for a user, as in the case of employee termination.